Artograph Prism Tutorial
Projection Area
- All opaque projectors work like a flashlight - the darker the room, the brighter the projected image will appear. The clearest and brightest images are produced in a completely dark room.
- To achieve the maximum image size of approximately 20X magnification, a minimum distance of 18 ft. (5.5m), measured from the label above the lens to the projection surface, is required (see Distance Chart for further information below). Movement of the projector is required to achieve the desired size.
- ARL projector is mounted on the adjustable table stand for overhead projection. If you dismount the projector for your projection needs, please mount it back onto the table stand after you are done.
Projecting
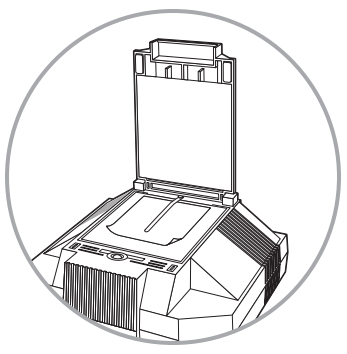
- To place artwork in the projector: lift the copy board lid of the projector and mount your copy face down onto the glass surface. Close the cover, check that the projector is plugged into an outlet, and turn the projector on by flipping the switch at the back of the unit.
- You are now ready to adjust the size and clarity of the projected image. Always adjust the desired size of the projected image first before focusing it. (See Distance Chart for approximate distance.)
| Range | 2x | 5x | 10x | 20x | |
|---|---|---|---|---|---|
| Distance | 32"
(81.3cm) |
57"
(1.4m) |
8.6'
(2.6m) |
16.5'
(5m) |
| Range | .8 | 1x | 5x | 10x | 20x |
|---|---|---|---|---|---|
| Distance | 24" (61cm) |
23" (58cm) |
47" (1.2m) |
89" (2.3m) |
14' (4.3m) |
| Lens in reduction position | Lens in enlargement position | ||||
CAUTION: During operation, ensure the projector is properly ventilated. Do not block the exhaust or inlet vents located on the back and sides of the projector.
General Focusing & Enlarging
- The Prism both enlarges and reduces with one reversible lens - remove the lens, turn it upside down for opposite projection.
- The size and clarity of your projected image is determined by the distance of the projector from the projection surface and the focusing of the lens. The farther the projector is from the work surface, the larger your image will be. As you change distance, you will have to slide the lens in or out slowly within the lens barrel to focus the projected image.
- The projection range of this lens is 80% (4/5 x) reduction (20% less than the size of your original), up to 20 times enlargement. Please Note: A gap exists in the projection range that cannot be achieved due to the reversing of the lens –170% to 250%. You will have to adjust the size of your original to achieve a size in this range.
- A 3x magnification lens is available for check out at the Access Services desk.
Copy Area
- The copy area is 7” x 7”. This indicates the maximum size of copy the lens can see. This copy size, however, varies with the desired projection size. With greater enlargement, the lens sees less of the copy area.
Photograph Projection (Use Caution!)
Photographs are commonly used in projectors; however, a few precautions must be taken:
- Work from a copy of any valuable or important photographs. Never use an original if it cannot be replaced. Photographs were not intended to handle the intense light and heat created by a projector. Though this projector is fan-cooled and ventilated to keep the copy cooler, it does get hot and photographs may be adversely affected byhe heat and light.
- Never project old photographs as they are particularly sensitive to heat and light and they will be damaged. Again, have a copy made.
- To prevent photographs from curling, mount them to a stiff backing material or put them in a picture mat.
- When projecting, make sure that the fan is operating and that the cooling vents have not been obstructed. When nished tracing the projected photo, turn the projector off and remove photo.
Tips & Techniques
Oversized Copy
If your original is larger than what will t onto the copy area, remove the lid from the projector by pulling up the cover carefully and removing the two pivot pins. Place the image on top of the projector. The lens will still only see a 7” x 7” portion of this copy, but placing it on top will allow you to move it around and project it in sections. Once you have drawn a section, move the copy and realign the projected image to the stopping point of the traced area.
Resume tracing and repeat as many times as necessary.
The other alternative to oversized copy is to reduce the original on a copier, so that it is within the 7” x 7” copy area.
Small 3-D Objects
Small 3-D objects can be projected by removing the projector lid and placing the object
on top of the projector copy area. To ensure maximum image clarity, place a box over
the top of the object to eliminate ambient light (light escaping from the top of the
projector). To project 3-D objects which are larger than the 7” x 7” copy area, take
a photograph of the object and project the print.
CAUTION: Do not mount aerosol cans or pressurized objects onto the projector. The hot surface
may cause them to burst.
Measurements of Projections
To determine a particular scale of a projected image, mount a 6” ruler next to the copy or draw 1” grid lines onto the copyboard itself. If specific enlargements are frequently used from common originals, mark the floor with tape. Position the tape at desired distances and mark the image size directly on the tape for future reference (i.e. 10x). Then align the cart or table with the tape mark to attain that size.
Minimizing Distortion
Distortion is largely created when the projector is not projecting squarely (perpendicular) onto the desired surface. Imagine shining a flashlight onto a wall. If the flashlight is shining straight ahead, the light is a round circle. If the flashlight is turned to an angle, either up or down or back and forth, the circle of light is distorted. This same concept applies with a projector. To minimize distortion, always keep the projector level and the image square to the wall, canvas or other vertical surface.
Information adapted from Artograph Prism User Manual provided by manufacturer.